Showing posts with label Hail Caesar Battle Recaps. Show all posts

Saturday, March 8, 2014

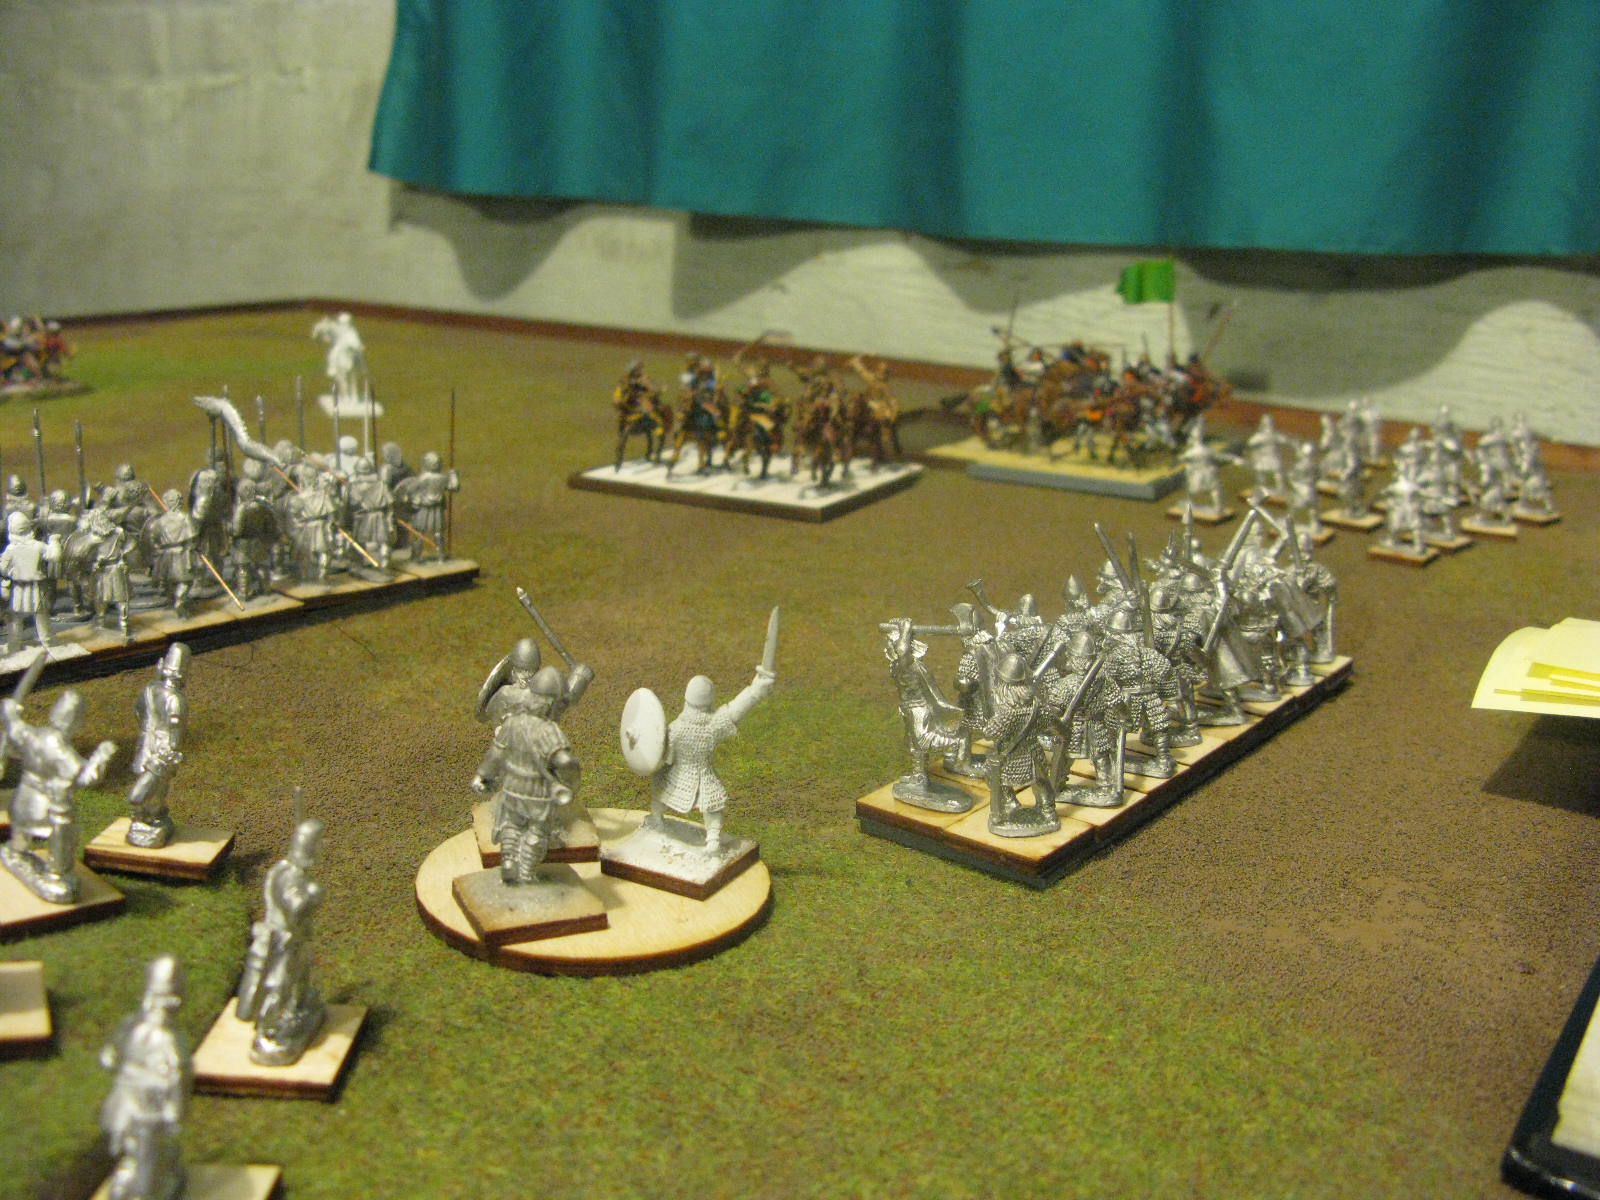
The Battle of Arsuf


 Tuesday evening we returned to one of our favorites, Warlord Games "Hail Caesar!" . After a couple years of WAB and its WAB II incarnation. Hail Caesars game mechanics quickly won us over and its been our large format "go to" game ever since.


 This match was a demo for an event our group, (when I say our group, I mean  Rich) is running at Little Wars in late April. The Battle of Arsuf  was a pivotal battle of Richard I's 3rd Crusade.  Rich has a massive Arab army he's been working on for years, and a large amount of Crusaders as well, with couple of us helping out filling out the remaing details. With 4 divisions per side at 450 points per side this is a huge "Hail Caesar" game.


 The game coincidentally or not played out similar to our notes on the real battle.  I was running the Crusader Vanguard and was quickly engaged by annoying Skirmishers, including the incredibly annoying Nafitum (who throw flasks of flaming oil, immediately causing a break check on any wound. super dangerous to Cavalry) Having faced them before my Templars and Mounted Sergeants charged from the line getting lucky with a 3 move Order, However the Nafitum easily evaded. However if I could stand my ground the next round of shooting, I was in excellent potion to run down a whole bunch of skirmishers and med infantry with tough Cavalry, I survived the shooting
and did just that. This led to early collapse of lead flank turning the battle back toward Saladin.
 On the rear flank, per the Battle the Hospitaller Knights broke ranks with a 3 move charge and quickly got themselves in trouble until Mike end up reinforcing them and after several turns it did break his way.
 In the Center a long stalemate of failed orders under King Richard led to Saladin and his Body Guard
just waiting him out to see how the battles on flanks were going.  One of the great things about Hail Caesar, unlike various version of Warhammer is the Late Game , In Warhammer the fate of the game is often decided in the first two turns, and barring some extraordinary circumstance the game becomes an attrition toward the inevitable. Not so in Hail Caesar! where the late game of turns 5 and 6 often is the battle decider. This always keeps the game exciting until the last turn.

 When the Crusader counter attack finally comes in turn 5 with support of the Templars rolling up on Saladins Right Flank while the rear flank was steadily collapsing. Rich wisely pulled Saladin back and reformed a tight unit with his Bodyguard Cavalry..unfortunately the exhausted Crusaders didnt get the orders off complete to bridge the distance and the game ended in DRAW with the none of the four objectives (two for either side being completed).

The Battle of Arsuf

Saladins Forces

Division I

Mamluks with Spear and Bow
Berber Heavy Cavalry
Turcoman Light Horse X 2

Division II
Dismounted Mamluk x 2
Medium Archers
City Militia with Spears

Division III

Mamluks Bodyguard
Mamluks Spear and Bow
Syran Heavy Cavarly
Turcoman Light Horse

Division IV
Ghazi warband Fanatics
Medium Archers
City Militia with Spear
Light Archers X 2
Nafitum

Objectives
Break Hospitaller Division
Destroy Army Standard


Richard I  Forces

Vanguard Division

Holy Order Knights (Templars) Heavy Cavalry
Heavy Infantry
Heavy Crossbow
Mounter Sergeants - Heavy Cavalry

Division I- English
Crusader Knights- Heavy Cavalry
Heavy Infantry
Heavy Crossbow
Archers

Division II- Outreamer
Crusader Knights- Heavy Cavalry
Heavy Infantry
Heavy Crossbow
Archers

Rear Guard- Hospitallers
Hospitaller Knights - Heavy Cavalry
Heavy Infantry
Heavy Crossbow
Turcopole Horsemen (Light Cavalry)

Objectives
Break or Rout Saladin and his Bodyguard
Break two of the three Cavalary Divisions


Looking forward to this game at little wars I am putting together Richard I giant army standard which should be a nice table center piece. I've missed playing HC  this was a really fun game!

Thursday, February 23, 2012

Dark Ages Campaign Concludes


Round 8 of our Dark Age Campaign came to an end last week. With a three way on territories going into the last round it was really anyone's prize to seize in Round 8. Rich and I had fantastic game it was very close with me probably slightly ahead going into the last couple turns. I made a gamble move I didn't need to go for some big points and it backfired, leading me to a bad luck serious of event that took me for slightly winning to a major loss. If I had just played conservative the last few turns a close score between Rich and I really would have changed the map dynamic above to where (given Chris's  score)  the winner would have been decided by a few territories or a tie breaker of total armies raised. In the end the big Victory for Rich . Gave the Caliphate of Cordoda the clear Campaign Win. Conquering nearly half of the known world (even back in Ireland, again after I kicked him out once, argh!)  Chris wrapped up in second with a good score and wisely invading all the remaining neutrals territories he could last round..Chris picked a I think 6 territories the last turn. The Saxons got a serious push back but maintained a decent sized empire all the way across the North. The poor Normans survive barely, with a few territories even reverting to Neutral Baronys.


I am pretty happy with the way this Campaign system worked out..there were a few tweaks along the way. But I'm confident good system with some unique mechanics if you want to play a map based campaign with  moves against multiple opponents in a single round and want to resolve them with just one game. Best part about the system is that it can be used for any size army game..its totally neutral to what you use it for, you could use it for a board or card game if you wanted to...you give even play your favorite themed campaign and resolve all the games playing chess. You'll be reading about the first two of my own projects. a Skirmish Fantasy Ruleset and The Campaign Systems throughout the year here.  You'll also get to see the campaign playtested again this year as we gear up for another Ancients Campaign, (Antiquity this time, probably 300BC ish) later in the Summer.

I'll leave with a pair of Battle narratives written by both Rich and Chris describing their victories
in the final round!  Hail Caesar for the Win!.

Round 8 - Arabs vs Saxons on the river board
Mission: Take the High Ground (objectives)

John set up broadly, with each division equally in one third of the table. I set up the Damascus division in the center in 2 ranks; Berbers in a line to the right and split the Ghulams with the 2 heavy between the infantry divisions & the light units skirmishing on the left flank.

The center hill was the key component of the battle. John moved Huscarls & a large Coerls unit onto the hill which were charged by the heavy Ghulams. While able to chase off the Huscarls, the Royal Ghulams were flanked by archers (and despite counter charging with my own archers) and were broken. (In the final round, John managed to roll 3 6's out of 4 dice for hits!) The second Ghulam unit was shaken and chased off. And to top it off, the C-in-C was lost fighting the Huscarls.

The Damascus unit dithered about in the center for a number of turns, either being disordered by skirmishers or slacking about with critical lack of leadership.

The Berbers on the right flank fended off all attempts to cross the river & spent most of the game shooting up a cavalry unit & some Coerls. I believe John failed to move the final 3 rounds of the game & I had no reason to leave my objective unguarded.

Shooting on the left flank started well with John's heavy cav being blown off the board by a pair of 1s on a shooting break check. Slowly, the rest of the division crossed the river & chased my shooters back into the center of the board. The standard unit of Turkomen were broken by the Vikings, but it set up a flank charge by the Damascus archers which pushed John's units off the board.

Top of the eighth. Its looking bleak for team Arab. Surrounded by Saxons and down on points. The Viking/Coerl group needed 3 moves to charge into the Damascus Archers - and they succeed. Luckily, the Archers are only pushed back by the combat & the Vikings are shaken to prevent any pursuit. Huscarls with C-in-C charge into the foot Ghulams + City Spearmen. Being fully rested from doing nothing this game, Team Arab breaks the Huscarls & kills the C-in-C. Moving up, the units are ready for a final charge against the large Coerls guarding John's objective.

Bottom of the eighth. The Volunteers - a unit which last took an aggressive action some time in early January, pass their leadership with double 1s & rear charge the Viking/Coerls. With a flurry of righteous blows, the Vikings are dispatched to Valhalla. Game ends with the Ghulam/City Spear team breaking the Coerls and claiming the objective. Adds up to 30 victory points being scored in the eighth.

Final: John 12 Rich 37


Round 8 -Normandy vs Byzantium
Pitched Battle

The board had a small town on one side, hill in the center, and forest on the other. Both players deployed, avoiding the town on one flank, between mid-field and the board edge with the forest, loading all the cavalry on the forest side.

Aaron had the first turn and it was pretty uneventful. His infantry divisions crept forward, and his cavalry division stumbled over it's own hooves (a theme for the next 2 turns). Chris shuffled forward and into shooting range.

The face off between the Cavalry divisions lasted a couple turns. Aaron failed to move his cavalry - he was sweating because he deployed his units sideways on the board so that they would fit - but he did manage to hold off Chris' charge with shooting disruption. Supporting Chris' peltasts took the woods and began a game long poo-flinging contest with Aaron's archers, with no side the victor. Aaron finally engaged the cavalry units, and after a few combats over a couple turns a Pyrric victory resulted; Aaron was left with a shaken heavy cav and Chris, a small light horse archer. These two units were then stuck in a perpetual cycle of shooting wounds and rallies.

Chris' center division mimicked Aaron's cav and stared at the hill for half the game. Eventually, Chris' lancers were able to 'lance' a unit of archers and half a medium unit before becoming shaken, themselves. The rest of the division joined the other infantry.

The infantry divisions of both sides stayed about 15 inches apart until the last few turns. Chris was able to disrupt Aaron's line with shooting for a couple turns. Aaron even managed to disrupt his own line with a blunder. He was able to return fire, but Aaron's archers seemed to do more harm slowing the advance of his heavies than good. Aaron was unluckier than Chris in roughly even combats when the armies finally met, establishing a victory for the Byzantine Empire.

Final: Chris 22 Aaron 10

Thursday, November 17, 2011

Dark Ages Campaign Round 3


Here is current map as the move portion of turn 3 is under way and the games that will dictate the results of these moves will take place this coming Tuesday. So far the Campaign using Warlord's Hail Caesar rules has been great. We are playing either Pitched battles or picking from a handful of scenarios. As I mentioned as great many battles are fought each turn and it abstractedly resolved thru the one game week. This campaign system , something I cooked up based on trying to solve numerous things that went wrong with many, many Campaigns I've run over the years. Pairs are simply round robin, the only caveat being that if the majority of your battles are against someone in particular then you play them regardless if its two weeks in row. being our third week that isnt a problem yet, and because I got stomped last week by the Caliphate (more on that in moment) My turn hasnt happened yet, and since the Caliphate has repelled and the Saxon invasion, counter invaded and is now sitting in Ireland ( Arabs in Ireland in 1000 AD, my Ancestors are cursing me)
Rich has decided to put the pressure on his neighbors the Normans. Whether I make minor strikes against my neighboors or go for a viking-esque raid on the Byzantine Empire I don't yet. One the benefits in being the weeks loser (ye with least number of Armies on the board) means you get to last, so you can see what the other players moves are. This mimics the "Risk" type board game mechanic I was going for.


As for my game last time around The Saxons invaded, Northern Spain, Rich and the Caliphate counter invaded Ireland.. I made some  small moves againt Neutral Armies and the Normans. The scenario we play was a "Camp Raid" where each player had camps in opposite corners of the board and deploy toward each other (for the short edge long ways) the kicker is one of your three divisions is in reserve and must roll to come on.I had one of my Divisions stupidly near the enemy reserve deployment, and of course fail orders on my part had them not get out of away before Rich got his reserves on first time and roll right over one divisions flank standing at the edge of my camp. Luckily I had some good performing units although not my Huscarls who for once seemed not at all the indestructable tanks they have been. mainly due to getting engaged with cavalry. My Second Division performed well keeping two division of Arabs at bay outside my camp, until my reserves finally came on (3 turns later) and started toward the Arab camp. The pressure from my reserves made Rich have to split his offense force to have some of it go back and support the camp..
There where a few turns where the battle actually started to drift back to my direction but its was not to be and I suffered enough early losses and didnt get the breaks I needed late to really flip it the other way.
As result, Rich got major victory ( or Conquer III as our scoring metric calls it) It was a fantastic and dramatic game.  I did score enough points in our game  to keep from getting totally creamed in some of my other battles on the map many of those resulted in draws or minor setbacks. I still lost enough amries and territories to be in last place but not by a ton. A good week could flip any of us to the top, but right its clearly the Caliphate of Cordoda expanding across Dark Age Europe. Lets see if anyone can stop him this week!>

Wednesday, July 27, 2011

Hail Caesar! in the Dark Ages


Another fantastic round of Hail Caesar took place with our Dark Age armies last night, with Aaron and I running a huge English force of combined Norman and Saxon models. 3 Divisions with 5 units per division we easily pushing 300 models. Rich and Chris ran Richs Muslim forces combined with Chris Macedonians proxied as Greek and Latin Mercenaries for another imagined East vs West Skirmish circa 1100AD. English vs Damascus and its Mercenaries.


We put it all down on and 12 foot by 4 foot table (adding a 4 x4 to my 4 x 8) although we only used 11 feet. Big games like this are blast in multiplayer and Hail Caesar rules really shines in the environment. Only our second attempt at the rules but its really coming together, we figure by the third game we will have all the bells and whistles down.


Everyone is gung ho and building up and painting their armies and we are starting a Dark Age Campaign after we finish our current Pirate (legend of the high seas) campaign.


Again forgive the unpainted terrain and models , this will be changing soon and we have solid group commitment to making this game look as good as it is fun to play. Here's a brief narrative I wrote from the English perspective today. that sums up the game Unlike last time, We won the day. I think Aaron is doing actual bat rep with army lists so I will leave the details to him.


In the fog of war...only Archers from division 1 manage to receive their orders and proceed across a forested hill and a volley of arrows routs a small unit of Turkish Archers on the flank, The remaining Saxon forces unintentionally delay, allowing a huge return volley of arrow to break and rout one of our Shieldwalls. Regardless the the Norman Cavalry (set behind a large hill) ambush smashes the Ghulam and Turkoman Cavarly that would threaten Division 1's flank...with the flanking threat gone from both sides the remaining Turks ignore the heavy losses and a retreat order and charge into combat., pushed back by the Saxons who are personally led by the Army General they are then re-engaged and smashed by our Huscarls axes, although the remaining unit of Fyrd takes heavy losses.. Skirmishers from Division 1 move into the hill country and surprise a small group of Berber infantry guarding the second enemy divisions flank and rout. them. Meanwhile the Norman forces proceed across the river to engage the enemies 3rd division of Mercenaries on the right bank.


In the Hill country, disorganization wins the day on both sides, as unaware of whats happening on the left river bank neither unit properly receives orders, causing one unit of Fyrd to strike out alone and take heavy losses from Turkish shooting but none the less holds disordered. being advanced on by the City Guard and supporting archers, The Viking Raiders sweep past the disordered Fyrd in the nick of time and attack both units routing them. the remaining Damascus Light Cavalry seeing its infantry destroyed and on coming Vikings retreats from the battlefield and lone unit of Heavy Calvary follows suit. The remaining Saxon Forces never saw action due to poor weather conditions. (failed order checks)


On the far side Normans and Latin Mercenaries fought to draw..although with Damascus' armies broken the Mercenaries fought for personally glory and eventually pushed the Normans back across the river but to avail as the much larger English army still held the majority of the battlefield.


Wednesday, July 6, 2011

Hail Caesar- Putting it to the test!


The battle line are drawn, a whopping 325+ models


We played our first game of Warlord Games new "Hail Caesar" rules last night and I am glad to say it was great success..despite the mandatory rulebook scouring the game moved along, well played well and most importantly felt like a "real wargame" . After years of Wargaming with results determined by random dice idiocy. It was great see a game where I felt the randomness was in "all the right places". I really felt like we were in control of our forces and results were risk vs reward based on choice of engagement. I think there is good balance in this games effectiveness between the excellent orders systems, the minimization of shooting, (where it can, of course be deadly, but not game controlling) and a great Hand to Hand systems, most of our questions had to do required movement due proximity of enemy units and what happens to units that have retreated have not broken. I answered 99% of these myself by going the rule book in detail with examples of our own play fresh in my head. (Disordered but unshaken unit moves off the table is it destroyed?)


Games is big enough that I can only fit half in a shot.


Mocked up command stands. Hail Caesar recommends round bases for command units and square for regular units for easy id...I like that idea...looks cool too.

Our game was set toward the end of the Dark Ages with my English Forces (Saxon /Norman) vs Muslims circa 1100AD either an unaccounted for skirmish or something that could have been during the First Crusade, Rich ran his awesome Arab force which can easily proxy just about any Muslim force from Ancient times up until 1400 or so thats a pretty good investment as a historical army and that being the case his force is pretty large and mostly painted as he been working on it for a couple years now.


This was not good for Rich's Ghulam Heavy Cav., we got a bit cocky after this and decided to try out a "sweeping advance" sounded good in practice but I ended up disordered, facing another cav charge, not such a good idea after all.


Norman Knights in the flank couldn't break these guys one of the only incidents in a 3 hour game were fluky dice roll had any impact.

My Saxon forces on the other hand are straight up to Hastings era force (Alfred to Harold), so we added some Normans in to round it out to be a joint English force similar to what I imagine Henry the 1st..army would of looked like although I am sure he would have had much more Cavalry. Yes I know my army is completely bare lead or primed, at this point. But since my last Hail Caesar post I made alot of progress with the modeling and figuring out "what" I want this army to look like, which was something I wasn't wrapping my head around with WAB. So do expect some paint soon as this game is winner and if I am loving it I am surely painting it. Although there are rules for a multiplayer game, we played it as one on one, even thou Aaron was running one of my Division with the Norman additions to my force.


Conquests Norman Knights..a great kit and to scale..with Gripping Beast, Crusader and Perry Figs..as well with Warlord plastics..not always the case with new plastic figs.

Army lists are posted here courtesy of Chicago Terrain Factory.


Playing on the full 4 x 8 table was really the minimum required here, as when all was laid out there was over 325 models on the table. Now that's what a proper wargame should look like! There was too much going on to field a battle reports see the comments under the photos for some insight into the battle. The Muslims won in squeaker mainly due to my shaken Huscarls who were managing to holding fast despite being "shaken" eventually retreating into a hill and being destroyed on a tied combat.


End of the game here, my Huscarls taking there second flank hit of game, after winning and breaking a flanker in a previous engagement. tied the combat with only 1/2 attacks..force to make a break test..I rolled a "5" with no modifier, I had taken 6 wounds at this point my Stamina total so I was "shaken" thereby making my break result.."Give Ground Disordered with Supports together" While I didnt have any supports I retreated straight into that hill to the right, which broke me.


Look for lots more Hail Caesar soon, as the 2012 Adepticon Ancient online Campaign incorporates multiple rules sets (not just WAB)


My Crusader Viking Raiders here on the right were the money, Destroying those light cav to the top of the photo and doing a sweeping advance into the other unit of cav, destroying them in two turns. The Vikings "Tough Fighters" rule, gives you one failed attack reroll, you wouldnt think one die is a big deal but it is...these guys where my all -stars.


4 Wounds and two units of enemy cavalry later but still solid and victorious!, alas they weren't in the middle of the table were we eventually got butchered....


blogger templates | Make Money Online